由 Max Liou提供的答案,請至下列文章的留言處
http://sharelife9.blogspot.tw/2012/04/sql-c.html?showComment=1406216513458#c7212042466651064297"
2014年9月29日 星期一

2014年6月8日 星期日
菜鳥工程師要知道的十個秘密
文章取自:Inside網摘(http://share.inside.com.tw/posts/5078)
1、版本控制系統(VCS)
2、學會寫作
3、正則表達式
程式需要校驗某字符串是否含有 5 個字符、1 個破折號和 1 個數字,你應該馬上就能寫出 /^[AZ]{5}-\d$/。
4、程式庫的使用
5、SQL
每一個工程師都應該了解數據庫標準化基礎,能夠執行 SELECT(及 INNER、OUTER JOIN)、INSERT、UPDATE 和 DELETE。
6、會用 IDE、編輯器及 CLI 工具
要會命令行、shell 腳本、find、grep 及 sed 的使用。
7、調試
8、防錯性程式
9、團隊協作
10、利用現有程式
2014年5月19日 星期一
JavaWebApp+Struts2+JasperReport 功能實作
功能需求:
1. 另存新檔產出的報表。
2. 顯示當前頁數以及總頁數。
3. 控制每頁顯示筆數。
實作:
1. 另存新檔產出的報表(以annotation方式為例):
@Result(name = "genPDF", type="jasper", location = "/views/Report/testReport.jasper",
params={"dataSource","dataList","format","PDF"})
上述為於web上顯示。
@Result(name = "genAttachPDF", type="jasper", location = "/Report/testReport.jasper",
params={"dataSource","dataList","format","PDF","contentDisposition","attachment",
"documentName","Report"})
上述為另存新檔的寫法。兩者差異在,加入了contentDispostion參數設為attachment是另外新
檔,以及documentName參數將檔案名稱設為Report。
2. 顯示當前頁數以及總頁數:
在調色板中有個「Page X of Y」物件,拉進page footer即可。Y代表當前頁數,Y代表總頁 數。
3. 控制每頁顯示筆數:
原本想要做到動態顯示,由使用者設定每頁顯示筆數 ,不過目前先做固定筆數。
以每頁顯示10筆為例。在<Detail>尾端加入page break,在page break的Print When Expression加
入「($V{REPORT_COUNT}%10)==0」,REPORT_COUNT代表在這張報表中的第幾筆資
料,當顯示到第10筆時,印出page break來換頁。
1. 另存新檔產出的報表。
2. 顯示當前頁數以及總頁數。
3. 控制每頁顯示筆數。
實作:
1. 另存新檔產出的報表(以annotation方式為例):
@Result(name = "genPDF", type="jasper", location = "/views/Report/testReport.jasper",
params={"dataSource","dataList","format","PDF"})
上述為於web上顯示。
@Result(name = "genAttachPDF", type="jasper", location = "/Report/testReport.jasper",
params={"dataSource","dataList","format","PDF","contentDisposition","attachment",
"documentName","Report"})
上述為另存新檔的寫法。兩者差異在,加入了contentDispostion參數設為attachment是另外新
檔,以及documentName參數將檔案名稱設為Report。
2. 顯示當前頁數以及總頁數:
在調色板中有個「Page X of Y」物件,拉進page footer即可。Y代表當前頁數,Y代表總頁 數。
3. 控制每頁顯示筆數:
原本想要做到動態顯示,由使用者設定每頁顯示筆數 ,不過目前先做固定筆數。
以每頁顯示10筆為例。在<Detail>尾端加入page break,在page break的Print When Expression加
入「($V{REPORT_COUNT}%10)==0」,REPORT_COUNT代表在這張報表中的第幾筆資
料,當顯示到第10筆時,印出page break來換頁。
2014年4月18日 星期五
開發iReport web application 遭遇的exception
SAXParseException: 不允許屬性'uuid',出現在jasper。
原因:jasperrport.jar是4.2,與iReport Designer 5.5製作出來的jrxml不符。
解決方法:將.jar改成5.5即可。
PDF無法顯示中文字。
原因:iReport Designer 5.5並無中文字型。
解決方法:請參考別人撰寫的解決方法。
http://blog.kent-chiu.com/blog/2013/05/12/jasper-report-font-issue/
注意:所要加入的字型.jar要加到iReport Designer的ClassPath。
PDF無法顯示中文字。
原因:iReport Designer 5.5並無中文字型。
解決方法:請參考別人撰寫的解決方法。
http://blog.kent-chiu.com/blog/2013/05/12/jasper-report-font-issue/
注意:所要加入的字型.jar要加到iReport Designer的ClassPath。
2014年1月5日 星期日
2013年12月25日 星期三
如何跨領域研究以及困難
選擇進入IT領域後,不斷學習是必然的。不管是在自已的專業領域,或是跨領域知識,都是要學習的項目。那如何開始學習跨領域知識,洪教授有分享他的心得,如以下網誌:
台大資工 洪士灝&PAS Lab
http://hungsh-ntucsie.blogspot.tw/2013/12/blog-post_23.html
台大資工 洪士灝&PAS Lab
http://hungsh-ntucsie.blogspot.tw/2013/12/blog-post_23.html
2013年12月17日 星期二
2013年12月6日 星期五
寫程式這件事在學校與在業界中有何差異?
What's difference between college-level and corporate programming?
從台大洪教授fb分享的連結看到這篇,我想把他翻成中文,希望自已進入職場前多了解一些,甚至在研究所就開始加入一些觀點,來快速適應職場環境。也希望中文版的內容可以幫助到更多人。
(待)
quote from:
http://arstechnica.com/information-technology/2013/12/whats-the-difference-between-college-level-and-corporate-programming/
by Stack Exchange
從台大洪教授fb分享的連結看到這篇,我想把他翻成中文,希望自已進入職場前多了解一些,甚至在研究所就開始加入一些觀點,來快速適應職場環境。也希望中文版的內容可以幫助到更多人。
(待)
quote from:
http://arstechnica.com/information-technology/2013/12/whats-the-difference-between-college-level-and-corporate-programming/
by Stack Exchange
About the emguCV running in Windows Phone 8
在十月份的時候我在EmguCV的社群發了一封留言,請教EmguCV有沒有支援在WP8 APP。就在11/3我收到回覆,內容為:
Sorry, Windows Phone 8 is not supported. Windows 8 App store refers to the Windows 8 store running on x86, not Windows phone 8 store running arm. Microsoft is having too many different platforms at the moment:
1. Windows Desktop (regular windows executable)
2. Windows 8 App store App running on x86 (used to be called the metro interface)
3. Windows RT App store running on ARM (e.g. MS Surface, Surface 2)
4. Windows Phone 8 App store running on ARM (e.g. Nokia phones)
As silly as it seems, app build for one platform cannot run on the others. None of platform 2, 3 and 4 seems to be a success at the moment and market share is small. Emgu CV currently support platform 1 & 2. It is possible to support platform 3 but we do not see enough demand for it. We don't have a road map for platform 4 yet because open cv do not support Windows Phone 8.
Best regards,
Canming
整理:
EmguCV目前支援在x86架構上,所以Windows Desktop跟Windows 8 App可以呼叫來用。但是WinRT跟WP8是ARM架構,所以不支援。
在最後一段他寫了一些原因,也似乎婊了一下Microsoft。Win8 App、WinRT App跟WP8 App都是你家的東西,但build出來的App卻不能全部支援,有點愚蠢,而且這三個東西現在似乎還沒成功,市場也小。
WinRT目前需求不大,不支援。OpenCV不支援WP8,所以EmguCV也無法支援。
Sorry, Windows Phone 8 is not supported. Windows 8 App store refers to the Windows 8 store running on x86, not Windows phone 8 store running arm. Microsoft is having too many different platforms at the moment:
1. Windows Desktop (regular windows executable)
2. Windows 8 App store App running on x86 (used to be called the metro interface)
3. Windows RT App store running on ARM (e.g. MS Surface, Surface 2)
4. Windows Phone 8 App store running on ARM (e.g. Nokia phones)
As silly as it seems, app build for one platform cannot run on the others. None of platform 2, 3 and 4 seems to be a success at the moment and market share is small. Emgu CV currently support platform 1 & 2. It is possible to support platform 3 but we do not see enough demand for it. We don't have a road map for platform 4 yet because open cv do not support Windows Phone 8.
Best regards,
Canming
整理:
EmguCV目前支援在x86架構上,所以Windows Desktop跟Windows 8 App可以呼叫來用。但是WinRT跟WP8是ARM架構,所以不支援。
在最後一段他寫了一些原因,也似乎婊了一下Microsoft。Win8 App、WinRT App跟WP8 App都是你家的東西,但build出來的App卻不能全部支援,有點愚蠢,而且這三個東西現在似乎還沒成功,市場也小。
WinRT目前需求不大,不支援。OpenCV不支援WP8,所以EmguCV也無法支援。
2013年12月2日 星期一
How To Become A Hacker by Eric Steven Raymond
What Is a Hacker?
The basic difference is this: hackers build things, crackers break them.
The Hacker Attitude
To follow the path:
look to the master,
follow the master,
walk with the master,
see through the master,
become the master.
So, if you want to be a hacker, repeat the following things until you believe them:The basic difference is this: hackers build things, crackers break them.
The Hacker Attitude
To follow the path:
look to the master,
follow the master,
walk with the master,
see through the master,
become the master.
1. The world is full of fascinating problems waiting to be solved.
2. No problem should ever have to be solved twice.
3. Boredom and drudgery are evil.
4. Freedom is good.
5. Attitude is no substitute for competence.
Basic Hacking Skills
1. Learn how to program.
4. If you don't have functional English, learn it.
Status in the Hacker Culture
1. Write open-source software.
2. Help test and debug open-source software.
3. Publish useful information.
4. Help keep the infrastructure working.
5. Serve the hacker culture itself.
Reference:
How To Become A Hacker, Eric Steven Raymond, http://www.catb.org/esr/faqs/hacker-howto.html#why_this
Status in the Hacker Culture
1. Write open-source software.
2. Help test and debug open-source software.
3. Publish useful information.
4. Help keep the infrastructure working.
5. Serve the hacker culture itself.
Reference:
How To Become A Hacker, Eric Steven Raymond, http://www.catb.org/esr/faqs/hacker-howto.html#why_this
2013年11月4日 星期一

My First iOS app
終於開始自學iOS app撰寫了!

教材是Stanford University的iphone development 開放式課程CS193P 。
買了兩本工具書,精通OBJECTIVE-C程式設計以及探索IOS5程式開發實戰。
新的語言一定要Hello World! 一下。
//ViewController.h
@interface ViewController : UIViewController{
    IBOutlet UISlider *slider;
    IBOutlet UILabel *textValue;
    IBOutlet UILabel *hello;
}

@property (strong, nonatomic) IBOutlet UISlider *slider;
@property (strong, nonatomic) IBOutlet UILabel *textValue;
@property(strong,nonatomic) IBOutlet UILabel *hello;

- (IBAction)changTextValue:(UISlider *)sender;
//ViewController.m
@synthesize slider, textValue, hello;

- (IBAction)changTextValue:(UISlider *)sender {
    int SliderValue=slider.value;
    textValue.text=[NSString stringWithFormat:@"%d",SliderValue];
    hello.font=[UIFont systemFontOfSize:SliderValue];

2013年8月17日 星期六
Parallel.Foreach取得目前元素之索引位置
想法:在影像處理run pixel上用了Parallel Foreach跟For,比非Parallel的快非常多,但是卻少了Index。在做pixel操作的時候有時需要知道要寫回哪裡。
實作:
byte[] byteArray = binary.Bytes; //size:307200
var query = byteArray.Select((val, idx) => new { Index = idx, Value = val });
int[] result = new int[byteArray.Length];
//平行 擇一上註解
Parallel.ForEach(query, b=>
{
if (b.Value >= 255)
{
result[b.Index] = -1;
}
} //close lambda expression
); //close method invocation
//非平行 擇一上註解
foreach (var b in query)
{
if (b.Value >= 255) result[b.Index] = -1;
}
結論:驚!! Parallel方法花了25ms。非Parallel花了17ms。Parallel for是否又比Parallel foreach?!
等國科會結束我再來比較一下Parallel for!!!
實作:
byte[] byteArray = binary.Bytes; //size:307200
var query = byteArray.Select((val, idx) => new { Index = idx, Value = val });
int[] result = new int[byteArray.Length];
//平行 擇一上註解
Parallel.ForEach(query, b=>
{
if (b.Value >= 255)
{
result[b.Index] = -1;
}
} //close lambda expression
); //close method invocation
//非平行 擇一上註解
foreach (var b in query)
{
if (b.Value >= 255) result[b.Index] = -1;
}
結論:驚!! Parallel方法花了25ms。非Parallel花了17ms。Parallel for是否又比Parallel foreach?!
等國科會結束我再來比較一下Parallel for!!!
2013年8月16日 星期五
在WPF將RGB轉HSV調亮度後轉回RGB再SHOW圖 using Emgu CV
想法:因為系統需要由使用者動態調整亮度。
實作:
Code:
private void slider1_ValueChanged(object sender, RoutedPropertyChangedEventArgs<double> e)
{ //sourceBgr&sourceHsv 事先建立
Image<Rgb, byte> rgb = sourceBgr.Clone();
Image<Hsv, byte> Hsv = sourceHsv.Clone();
CvInvoke.cvCvtColor(rgb, Hsv, Emgu.CV.CvEnum.COLOR_CONVERSION.CV_RGB2HSV);
int newValue=(int)e.NewValue; //取得slider事件發生後的值
string s = newValue.ToString();
label1.Content = s;
if (Hsv != null)
{
for (int j = 0; j < sourceHsv.Height; j++)
{
for (int i = 0; i < sourceHsv.Width; i++)
{
byte value=0;
if (Hsv.Data[j, i, 2] + newValue > 255) value = 255;
else if (Hsv.Data[j, i, 2] + newValue < 0) value = 0;
else value = (byte)(Hsv.Data[j, i, 2] + newValue);
Hsv.Data[j, i, 2] = value;
}
}
}
CvInvoke.cvCvtColor(Hsv, rgb, Emgu.CV.CvEnum.COLOR_CONVERSION.CV_HSV2RGB);
image1.Source = rgb.ToBitmapSource();
}
紀錄:Hsv的v(value)是亮度,只要調整它即可調整該PIXEL的亮度。
實作:
Code:
private void slider1_ValueChanged(object sender, RoutedPropertyChangedEventArgs<double> e)
{ //sourceBgr&sourceHsv 事先建立
Image<Rgb, byte> rgb = sourceBgr.Clone();
Image<Hsv, byte> Hsv = sourceHsv.Clone();
CvInvoke.cvCvtColor(rgb, Hsv, Emgu.CV.CvEnum.COLOR_CONVERSION.CV_RGB2HSV);
int newValue=(int)e.NewValue; //取得slider事件發生後的值
string s = newValue.ToString();
label1.Content = s;
if (Hsv != null)
{
for (int j = 0; j < sourceHsv.Height; j++)
{
for (int i = 0; i < sourceHsv.Width; i++)
{
byte value=0;
if (Hsv.Data[j, i, 2] + newValue > 255) value = 255;
else if (Hsv.Data[j, i, 2] + newValue < 0) value = 0;
else value = (byte)(Hsv.Data[j, i, 2] + newValue);
Hsv.Data[j, i, 2] = value;
}
}
}
CvInvoke.cvCvtColor(Hsv, rgb, Emgu.CV.CvEnum.COLOR_CONVERSION.CV_HSV2RGB);
image1.Source = rgb.ToBitmapSource();
}
紀錄:Hsv的v(value)是亮度,只要調整它即可調整該PIXEL的亮度。
在WPF做倒數計時器
想法:因為系統需要倒數計時器來執行拍照。
實作:
step 1: 加入System.Windows.Forms參考,並引入。
step 2: coding!
private void button1_Click(object sender, RoutedEventArgs e)
{
timer1 = new Timer();//global
timer1.Interval = 1000;
second = 5;//global
timer1.Tick+=new EventHandler(timer1_Tick);
timer1.Start();
}
private void timer1_Tick(object sender, EventArgs e)
{
if (second > 0)
{
label1.Content = second ;
second--;
}
else
{
timer1.Stop();
label1.Content = "";
BitmapImage bi = new BitmapImage(new Uri("/Image/p3.jpg", UriKind.RelativeOrAbsolute));
image1.Source = bi;
}
}
Label用FontSize調字型大小。
實作:
step 1: 加入System.Windows.Forms參考,並引入。
step 2: coding!
private void button1_Click(object sender, RoutedEventArgs e)
{
timer1 = new Timer();//global
timer1.Interval = 1000;
second = 5;//global
timer1.Tick+=new EventHandler(timer1_Tick);
timer1.Start();
}
private void timer1_Tick(object sender, EventArgs e)
{
if (second > 0)
{
label1.Content = second ;
second--;
}
else
{
timer1.Stop();
label1.Content = "";
BitmapImage bi = new BitmapImage(new Uri("/Image/p3.jpg", UriKind.RelativeOrAbsolute));
image1.Source = bi;
}
}
Label用FontSize調字型大小。
2013年8月13日 星期二
EMGU CV的GPU測試運作
想法:目前系統用到emgu cv non-gpu的函式,是否改用gpu 函式效能就會提升?
實作:先run起emgu cv gpu的函式,以及針對靜態影像做簡易的影像處理。
Step1: GPU package
Step2:
針對同一張800*533影像做灰階->FastCorner->轉bitmapsouce後用元件show圖,過程皆用Image類型運算。GPU cost time 是 82ms,non-gpu cost time是 17ms。
記錄:第一台ASUS BM6650 i5-2500 3.3GHz intel內顯 品牌電腦。執行時會有unknown error,初估是非nvidia的顯卡。第二台配備nvidia quadro工作站顯卡,成功執行。
結論:gpu函式再初始階段較耗時,在簡易的影像處理函式中無法展現高效能特性,或許在更高計算量的影像處理需要時,能展現其高效能之特性,像是KinectFusion(real-time 3D reconstruction)。
實作:先run起emgu cv gpu的函式,以及針對靜態影像做簡易的影像處理。
Step1: GPU package
GPU for image processing is only available for Emgu CV rev 2.2.1 and later. Only package containing -gpu in its name (e.g.
libemgucv-xxx-gpu-xxx) has GPU processing enabled.- Install the latest cuda graphic card driver from NVIDIA on your running platform.
- Copy the cuda and npp dll files:
cudart{bit}_{maj_rev}_{min_rev}.dllandnpp{bit}_{maj_rev}_{min_rev}.dllto the execution directory - Add
Emgu.CV.GPU.dllto References - Optionally put the following lines in the top of your code to include the Emgu.CV.GPU namespace.
Step2:
針對同一張800*533影像做灰階->FastCorner->轉bitmapsouce後用元件show圖,過程皆用Image類型運算。GPU cost time 是 82ms,non-gpu cost time是 17ms。
記錄:第一台ASUS BM6650 i5-2500 3.3GHz intel內顯 品牌電腦。執行時會有unknown error,初估是非nvidia的顯卡。第二台配備nvidia quadro工作站顯卡,成功執行。
結論:gpu函式再初始階段較耗時,在簡易的影像處理函式中無法展現高效能特性,或許在更高計算量的影像處理需要時,能展現其高效能之特性,像是KinectFusion(real-time 3D reconstruction)。
2012年5月5日 星期六
QRCode產生器與解碼器
從井民全老師的blog中看到有寫到有關QRCode的操作後馬上著手練習,之後又在youtube看到一個作者用很簡潔的內容寫出了QRCode的操作,以下的是參考monsterhunter445後寫出的程式碼。與井民全老師的差別在於,monsterhunter445作者是載入了MessagingToolkit.QRCode.dll。
原始碼分享在下面:
此程式可依輸入的網址來編成QRCode


2012年5月4日 星期五
紅綠藍瀘鏡運用&增加圖片亮度
紅綠藍瀘鏡運用與提高圖片亮度。
這一個程式bug找好久,因為我的邏輯跟作者寫的不同。最後我用自已的邏輯來使用function,才成功。
先說瀘鏡。與作者的code相比,我沒有setRGBData_unsafe( )與getRGBData_unsafe( ),我直接在ColorFilter功能裡完成了上述兩個功能的工作呼叫getRGBData( )與setRGBData( )來抓「三維陣列」與「由陣列建立新的 Bitmap」,然後更新掉image,就完成了。(另外,SHOW圖的方式也不同,作者用LoadImage( )影像公用程式,我寫不出來,所以用了另一個方法,這方法是在第一個範例裡學的。)(看紅字的code)
提高圖片的亮度與瀘鏡的計算類似,一樣一開始是做一個三維陣列,用三維陣列來跑每個pixel提高亮度,然後將三維陣列轉成Bitmap型態,再來把image更新掉,完成。
簡單的敘述執行順序:
點擊button->建立物件image->執行image.ColorFilter( )->用Bitmap把image包起來->
執行getRGBData( ),以取得存放pixel資訊的三維陣列->以此三維陣列執行瀘鏡的計算->
將三維陣列做成Bitmap型態的bimage->更新image->以視窗呈現處理後的圖片。
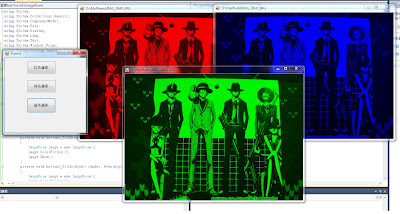
這一個程式bug找好久,因為我的邏輯跟作者寫的不同。最後我用自已的邏輯來使用function,才成功。
先說瀘鏡。與作者的code相比,我沒有setRGBData_unsafe( )與getRGBData_unsafe( ),我直接在ColorFilter功能裡完成了上述兩個功能的工作呼叫getRGBData( )與setRGBData( )來抓「三維陣列」與「由陣列建立新的 Bitmap」,然後更新掉image,就完成了。(另外,SHOW圖的方式也不同,作者用LoadImage( )影像公用程式,我寫不出來,所以用了另一個方法,這方法是在第一個範例裡學的。)(看紅字的code)
提高圖片的亮度與瀘鏡的計算類似,一樣一開始是做一個三維陣列,用三維陣列來跑每個pixel提高亮度,然後將三維陣列轉成Bitmap型態,再來把image更新掉,完成。
簡單的敘述執行順序:
點擊button->建立物件image->執行image.ColorFilter( )->用Bitmap把image包起來->
執行getRGBData( ),以取得存放pixel資訊的三維陣列->以此三維陣列執行瀘鏡的計算->
將三維陣列做成Bitmap型態的bimage->更新image->以視窗呈現處理後的圖片。


訂閱:
文章 (Atom)